But to do that, I first have to tell you about my dad. My dad is one of the most interesting, talented people I have ever met. He's a good ol' boy who makes friends everywhere he goes - I don't think I've ever met anyone who disliked my dad. He was always willing to work extra jobs if it meant that we could have the things we wanted, and most weekends growing up would find him at a rental house repairing a deck or putting new shingles on a roof with Mr. Neil. Or he'd be at a house in the South Side, administering medications to old people as an at-home nurse. My dad is so incredibly creative; I've seen him carve gnomes out of the knots in old trees, make beautiful stained glass windows, craft gorgeous, creative furniture for our family and build whole decks with nothing but a picture in his head. You should see his drawings - they're amazing. I have these 'where's Waldo' pages that he drew for me when I was little and I love them so much. I wish he drew more often. He has been an auto mechanic, a soldier, a nurse, a member of the Special Forces, a clown, a contractor, an antique sewing machine dealer, a youth pastor and a motorcycle safety instructor. Yeah, you read that last part right. In addition to all the other kinds of awesome he is, my dad is a biker. A road-trip taking, doo-rag wearing, Honda Goldwing riding biker. He is so much cooler than your dad.
So cool, in fact, that when I asked him to spend an afternoon helping me build a workbench, he didn't even bat an eye. I showed him the plans that I drew up, which looked like this:

Building with my dad was so much fun - I wish I had the opportunity to hang out with him more often. We made this amazing workbench frame in one afternoon, took the pieces to my house in the back of his Durango and then assembled the whole thing on the floor of my garage. Unfortunately, a last minute addition of two bracers on the outsides of the table center threw off our measurements, so in the end we only used one of the two cabinets that we built. It actually worked out, because now it looks almost exactly like my original plans. Also, we used some leftover MDF for the bottoms of the cabinets and the shelf under the table. It's sturdier than plywood and hey, it was already taking up space in dad's garage. (That's a joke, by the way. Someday I'll take a picture of dad's garage and you'll see why it's so funny.)
So this is me with my awesome workbench after we flipped it right side up:
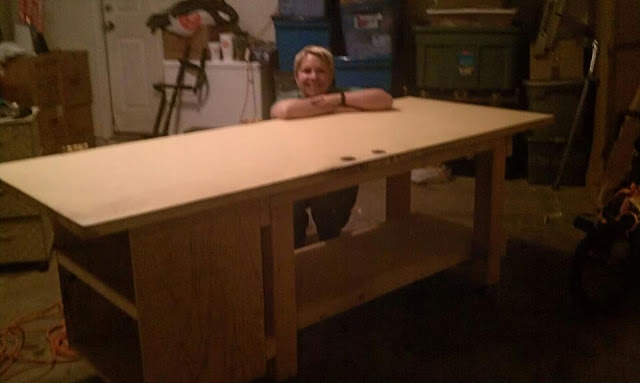
Now let me tell you a little bit about this awesome bench. It has four locking casters underneath to move it around my garage. It has two shelves in a cabinet on one end for storing my big tools and one large shelf running underneath for wood and toolbox storage. The end opposite the cabinet will have pegboard capping it so that I can hang my extension cords and frequently used tools. The whole thing is about to be wired with an industrial strength surge protector/power strip, so that I can use power tools without dragging around an extension cord. It has a 4" lip all the way around for clamps and is 32" wide by 80" long by 32" high, so it is exactly hip-height for me. It is so sturdy, I could dance on it and it wouldn't budge an inch or bow in any way. The top is a 2" thick solid core wood door with the hinges left on so I can butt projects up against them to keep them from sliding off the table. It is braced, nailed, screwed and glued. It is possibly the best workbench ever created in the history of the world, and I am so freaking proud.
See that door? That was a gift from Mr. Neil. It's the door that has hung in their kitchen for goodness only knows how long, and he saved it for me when I helped him hang the new door a few weeks ago. Those two holes are where the doorknob and lock used to be, and they're dead useful for dragging the thing around my garage. It was originally butter yellow on one side and green on the other, which I was totally cool with. But as soon as I started setting stuff on top of that yellow paint, it chipped and scratched and the part of me that still battles with my OCD couldn't take it. (Don't laugh too hard, I really do have OCD. Bad. I take meds for it and everything.) So I spent about three hours over two days chipping off yellow paint with a flat head screwdriver. Three layers of it, to be exact, and then a layer of white, and finally all that was left was primed wood. Well, not really wood - it seems to be real wood sandwiched in between two sheets of pressed composite. It's still solid and HEAVY.
I didn't care too much for the raw wood look, and I really wanted to protect my workbench from...whatever...so I decided to stain it. I have a serious weakness for stained wood - painting this thing didn't even cross my mind. I can't articulate how much it hurts me when someone takes a beautiful piece of wood furniture, especially if it's old, and paints it. I just want to cry. So I picked this pretty bombay mahogany and went to town.
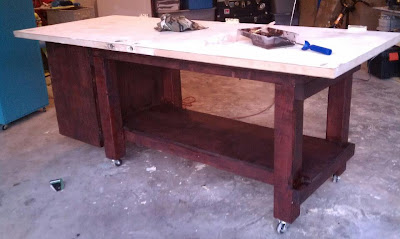
This is the workbench after coat #1 of stain.
 I really dislike paintbrushes. We just don't get along, I guess. No matter how nice my paintbrush is or how much I pay for it, I always wind up with hairs in my finish, or streaks, or drips. I just can't deal with it. To that end, I bought a small smooth roller (no nap) and rolled that stain on. It actually worked pretty well. The initial application would have these little bubbles in it, but if I rolled over it again without re-saturating my roller, they dissipated. I missed a few spots on the inside of the legs, and where the bubbles dried you could see a sort of leopard pattern in the stain. A second coat took care of that, though, and smoothed out the whole finish.
After coat #2 of stain. Please ignore my garage floor - I keep putting off sweeping it because I have to sand down that little table on top of the workbench and I don't want to have to sweep twice. But I couldn't sand while the stain was wet, so it's all just been far too convenient.
I'm actually not finished with my workbench yet - I have to add the power strip and pegboard, and I'm in the middle of applying several coats of poly to the bench to waterproof it and give the rough plywood a smooth finish. Plus, the poly makes it super shiny and I love shiny, sparkly things.
I'll keep posting updates as my workbench evolves. I haven't decided what to do with the top yet. I might paint it (only because it isn't pretty wood that could be stained) or strip it some more or just leave it alone. I don't know. Thoughts?
Why don't you make the top another project and do some sort of creative mural? Or better yet- make it something functional by putting yard stick and ruler markings permanently on it for measuring things that you cut. Just a thought. Love it though! You should come to Hawaii and build one for me!!
ReplyDelete